My Experience, and Advice, in Setting Up a Residential Solar Photovoltaic Power System (in Illinois)
July 27, 2007 (Revised 1/9/2008, 3/17/2009)
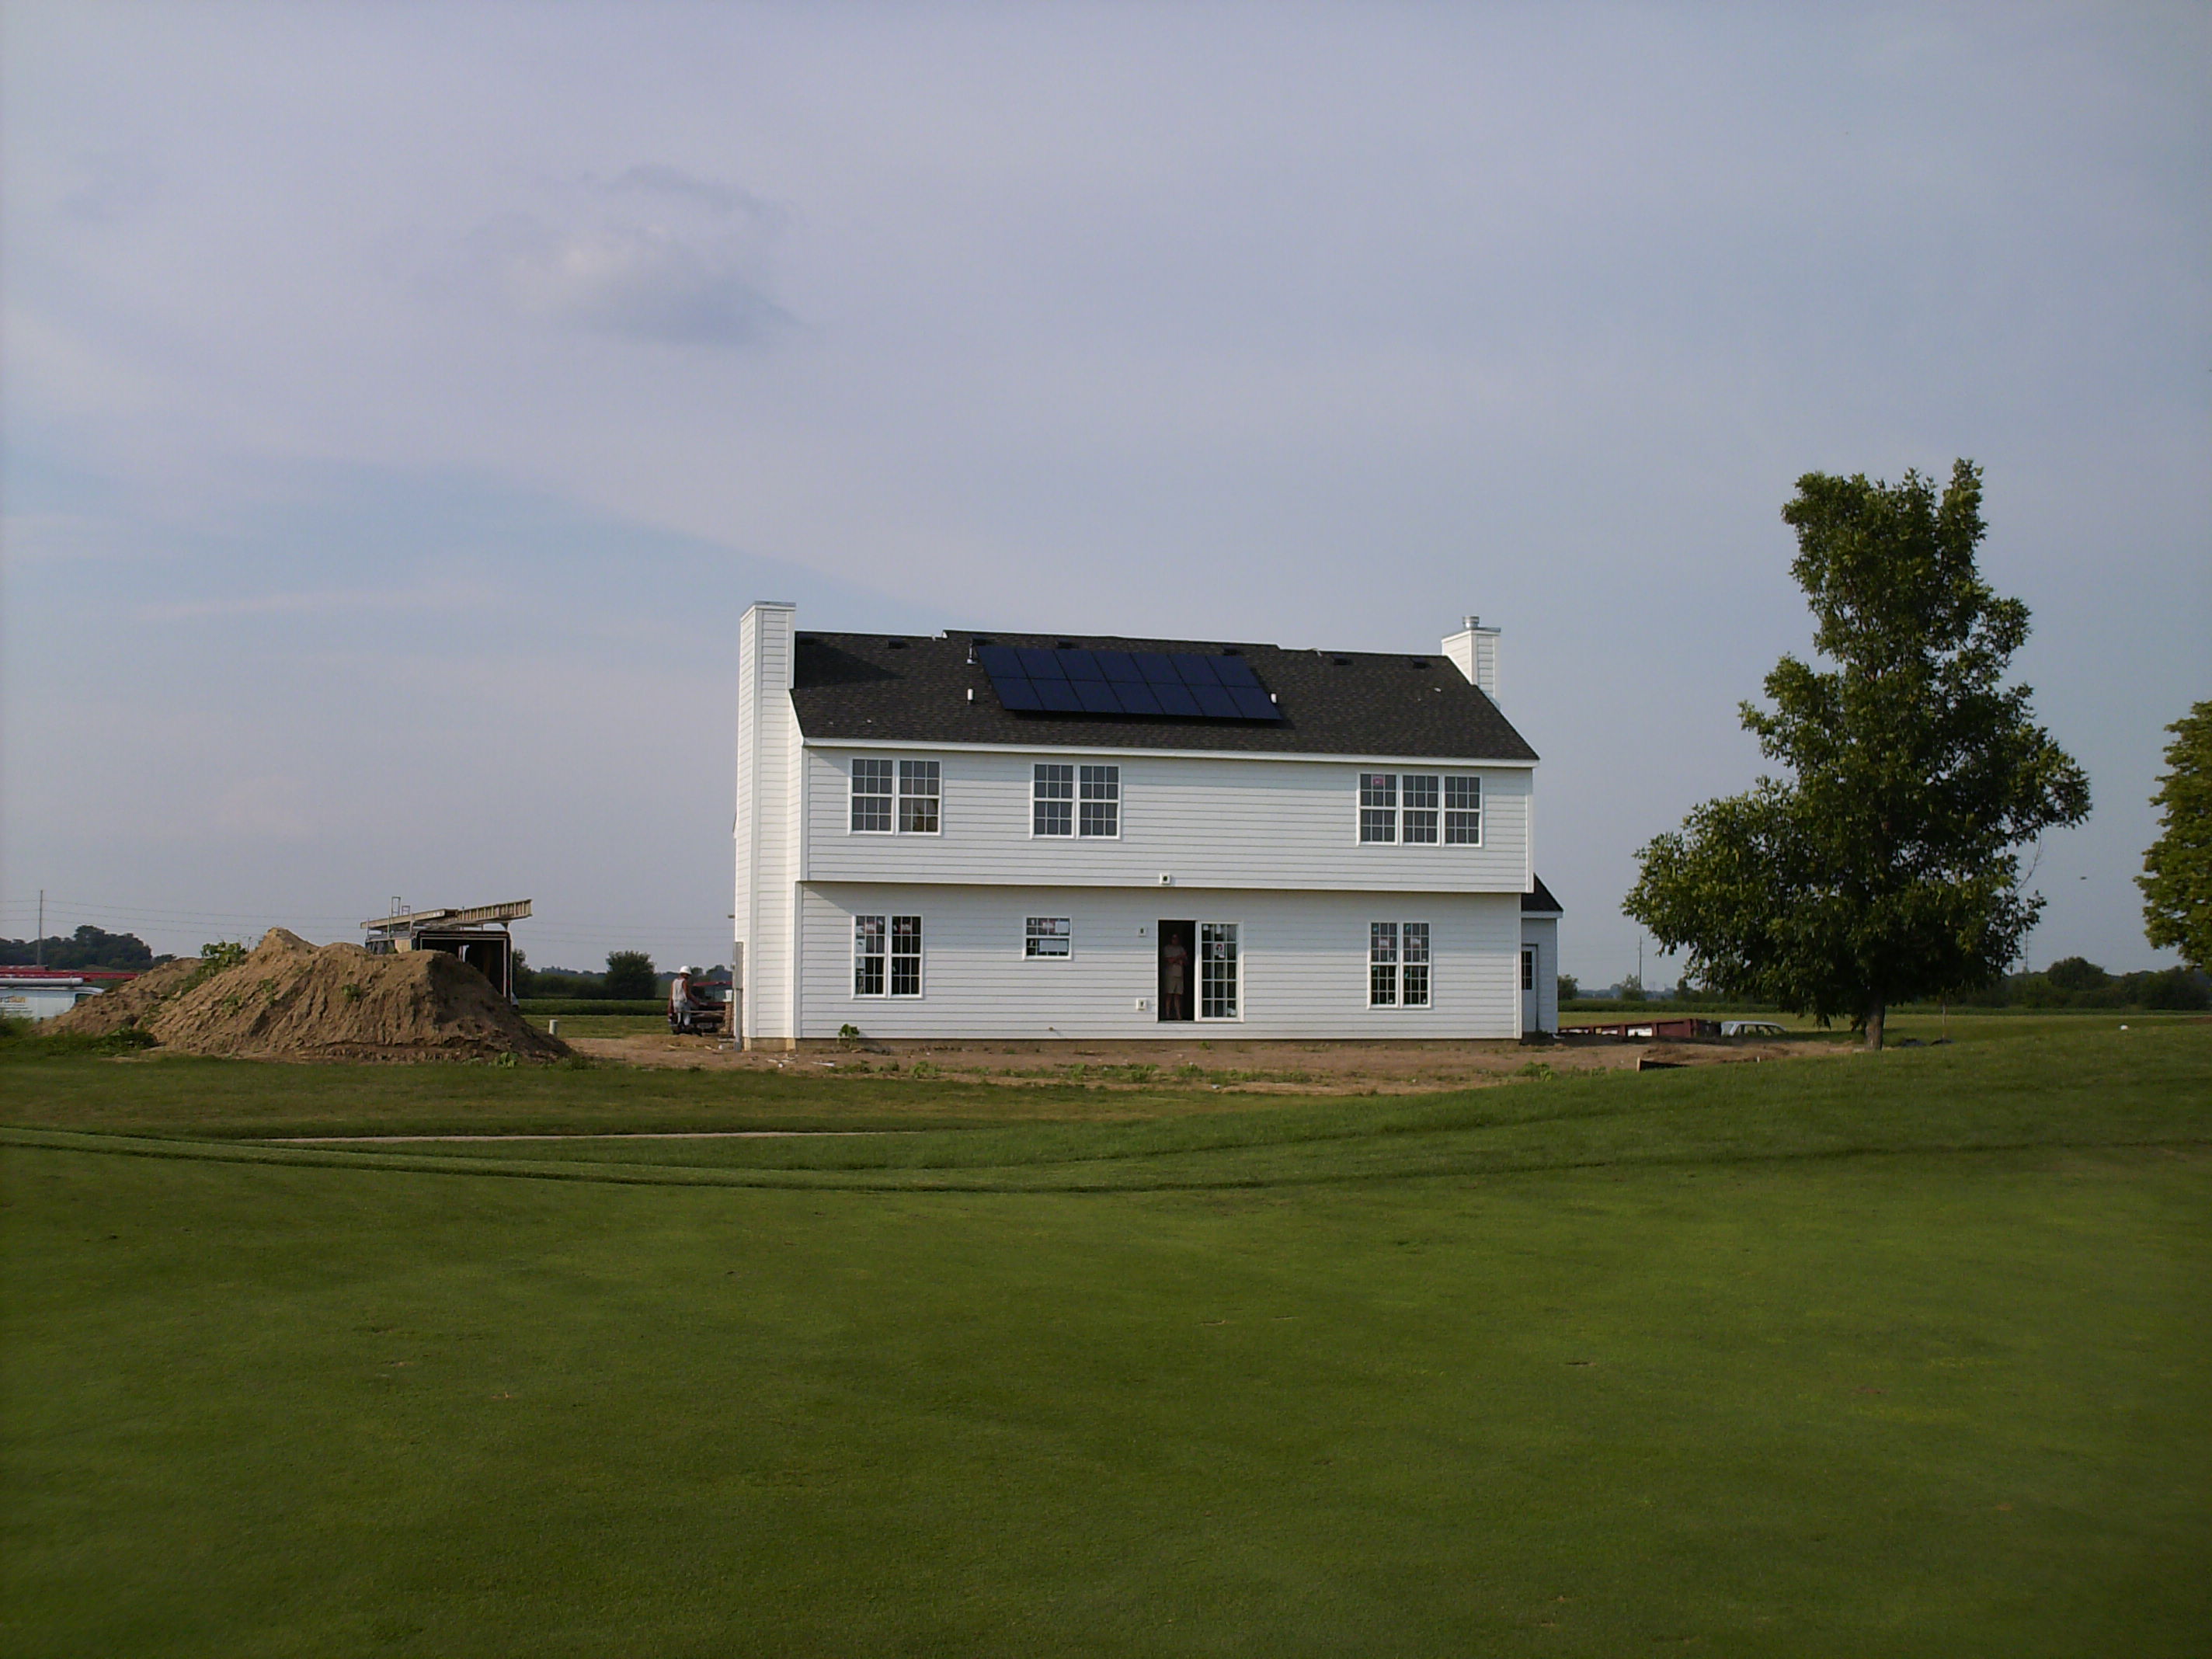
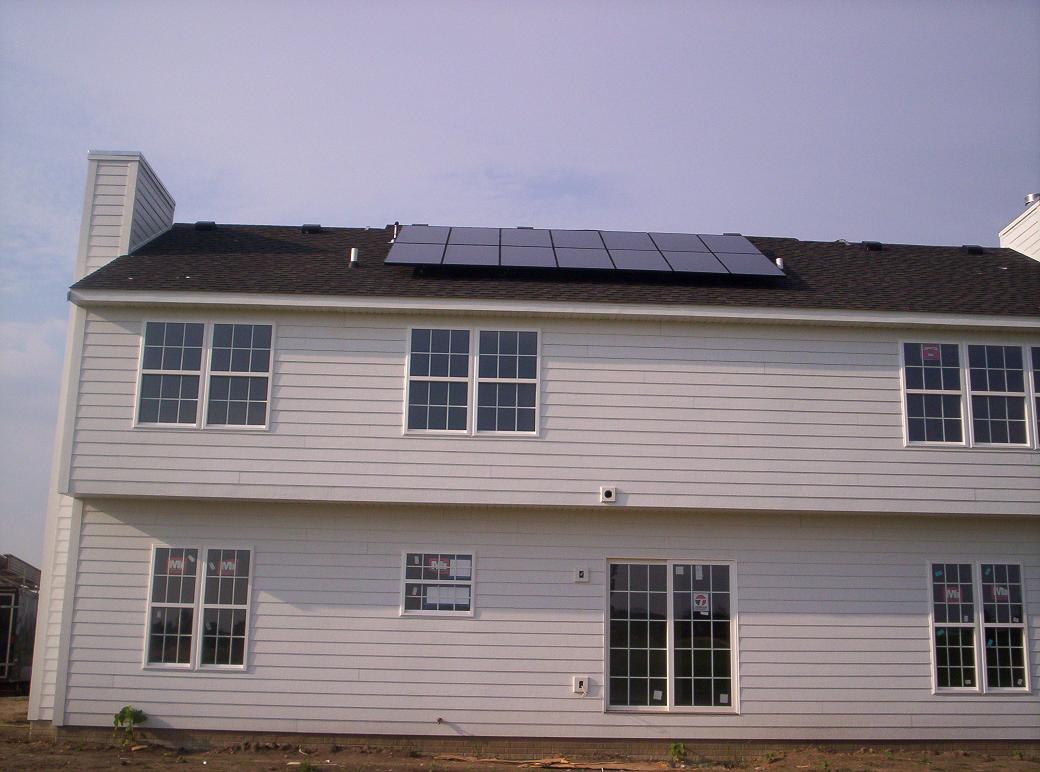
It has been about a year and a half since I set up the PV system shown below, and thought it would be a good time to update this site with some performance and experiences. I have left a lot of the page intact, but have added some on performance and some other updates. These days, it appears it is a little easier to get a system up and going, compared to 2007.
Why solar? Well, frankly, in Illinois it is a long payback period. However, I haven't regretted it one minute. First, I can't teach it and then not do it. Second, it is actually nice to have and I find people are pretty interested to hear about it here in the Midwest.
I put together this guide to share my experiences with others, and to give some advice for prospective solar power users.
I think the bottom lines for the average person to get one would have to be:
1) You think there is a payoff, even if distant.
2) You pride yourself on being an early adopter and setting an example (though no one like an environmental snob).
3) You have the money to spend and good sense to realize that it is wiser than, say, getting a $50,000 luxury car as opposed to a $25,000 hybrid car plus a $25,000 power system. In the case of the car, you're buying transportation plus prestige. In case of a solar power system, you're paying an upfront premium for electricity but also receiving some satisfaction.
OK, that's enough motivation. These systems are not quite turnkey, yet. There are many advances going on that will make adoption of solar easier in the near future. These are
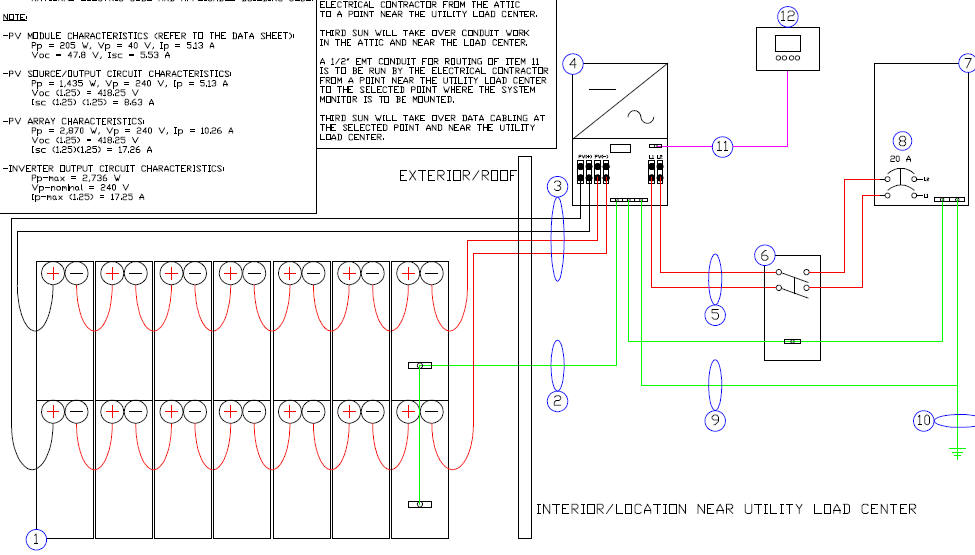
Much of the discussion below assumes you some very basic knowledge of PV systems, such as they're made of PV modules, racking, wiring, and an inverter. An example diagram of a system is given here. If not, 10 minutes will Google will provide you the background (though 100% technical accuracy is not guaranteed or likely).
The diagram below shows fourteen PV modules, connected in two parallel sets of seven. The modules have DC wiring connected to the inverter (4). The inverter is connected to a remote system monitor (12), the service panel (7) and the utility disconnect (6). This system is fairly typical in terms of wiring and complexity. It looks pretty simple if you have an electrical training, but wire choice, inverter sizing, array configuration, etc. have a lot of subtleties involved once the codes are considered.
Checking out your site
You will need, ideally,
1) A south-facing exposure. The south I refer to has to be true south (a compass follows magnetic south, so you need to confirm with a GPS system or other true longitudinal map). However, you can be with 15 degrees of true south and there will be essentially no difference.
2) A place to put the PV modules. This seems obvious too, but for an array of any size you will need probably 200 sq. ft., give or take. I prefer rooftop installation, though it is more labor intensive than ground mounts. I prefer roof mounts to ground mounts because the roof space is unused, but yard space has many uses. On the other hand, a roof-mounted system may need to be temporarily dismantled if you need to replace your roof at a future date.
3) A mount that faces the modules at the correct angle. In central Illinois (about 40 degree north latitude), you need to angle the modules about 35 degrees off the ground. Some will say modules need to be angled at the latitude angle. This is a close approximation for direct beam light, but in this area, particularly, there is a lot of diffuse and reflected light that contributes to the performance. If doing a pole mount, this is easy to adjust. Roof mount systems usually have some "play" in their rails that can compensate.
I strongly suggest using the PVWatts simulator to analyze your exact situation. There is also a more advanced program called the Solar Advisor Model (SAM). Either one is fairly easy to use and can give you an idea of performance. The contract installer will make their own predictions, but I have found some will be wrong.
Choosing a Contract Installer
As I am sure many of you are, I was tempted to do the installation myself. This is a bad idea, in my opinion, for a few reasons. First, it isn't that easy or safe, particularly on a rooftop. Second, installation/labor charges are modest in comparison to your time and effort, and come with insurance and warranty that your system will actually work right. Third, the state rebate program pretty much requires you to have a NABCEP (North Americal Board of Certified Energy Practicioners) licensed installer do the work. It is not strictly necessary for the rebates, but I just wouldn't mess with it and I'm pretty knowledgeable about these systems.
Unfortunately, in the downstate area, there are not many choices. If you're in the Chicago area, there are many - just do some surfing to get a few names. Local to the Champaign area there is Midstate Renewable Energy Services. I just recently came aware of another Champaign-Urbana area zero-energy home project: Insana Development. I have met with Insana several times and I'm excited about their approach to home building, which will use Unisolar type solar shingles. Also, a few installers have e-mailed me after seeing this site, and I recommend you check them out as well: Habi-Tek and Prairie Wind and Solar.
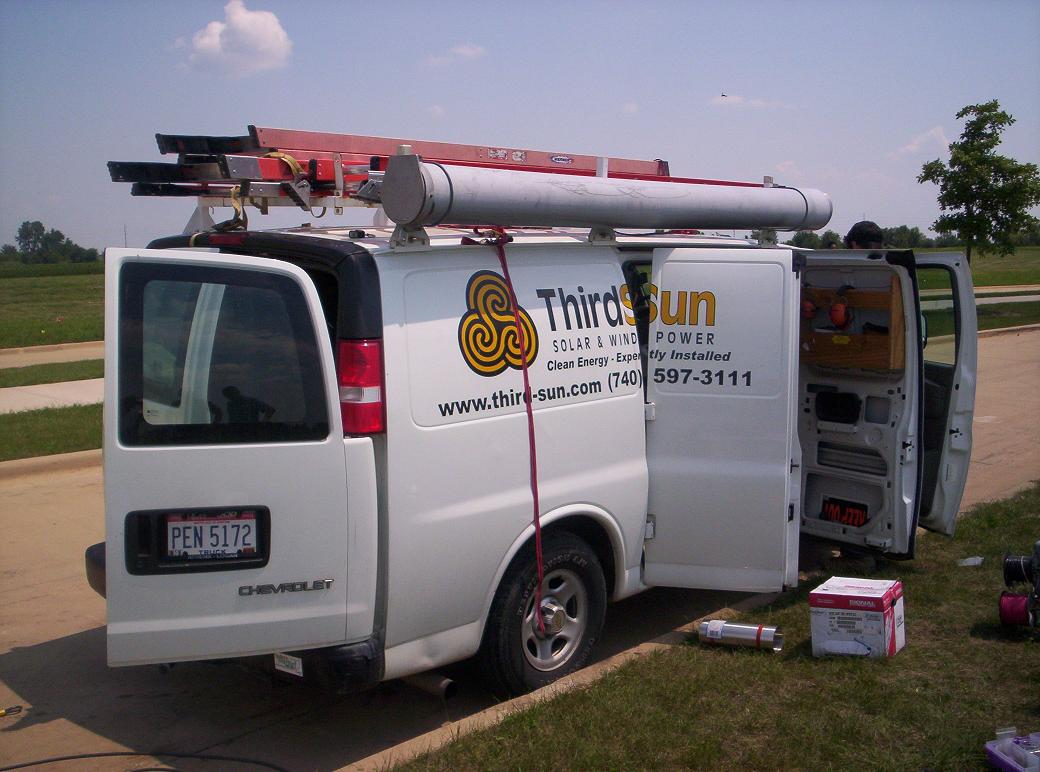
I used Third-Sun Solar, out of Athens, OH. They are a 6.5-hour drive from Champaign, but were very easy to work with and didn't charge me anything (significant) extra for delivery. They also had a variety of options and offered quite a bit of advise. In fact, they were far more responsive than the Chicago-area installers.
You will also need a local electrician for a few things. There will be some wiring needed that the installer may not provide. This is simple and inexpensive (e.g. a conduit from breaker to rooftop), and not worth doing yourself. You may need CAT5 run for an energy monitor, if you buy one. If using an out-of-state installer, they may need to subcontract to someone locally licensed, perhaps bonded, to do the work as the official contractor.
Choosing a System
Your installer will probably have one or more choices on a turnkey system. Clearly, you can build up a system from many suppliers, but the cost will not be much different and the performance will be complicated to deduce (and not guaranteed). It is probably possible to save a few dollars here if you order the PV modules from a different "middleman" than your installer, but I wouldn't count on it. The installer, in fact, does capture some markup on modules and hardware. However, they are familiar with their systems. The installer may charge you to engineer your custom system (liability is an issue here). If you are paying a total of around $9/watt (steadily decreasing), it is the current market price (varies with system and size), however they decide quote the individual components.
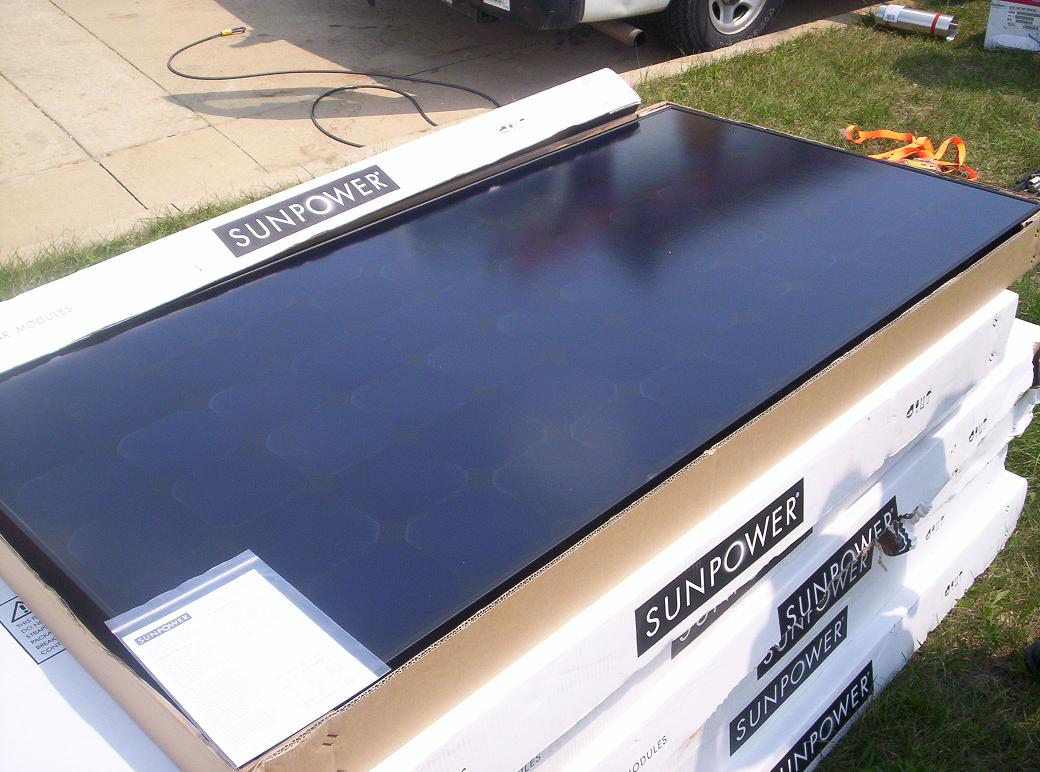
Third-Sun quoted me on two systems, based on Evergreen and SunPower modules, respectively. SunPower modules are a little more efficient and blend in with my rough well, but Evergreen modules are a better value for energy production and have lower impact on the environment. Another vendor quoted me on a SunWize system. Prospective buyers should definitely get several quotes and match the performance, cost, and appearance against their personal priorities.
You will also need to choose how big of a system you want. There will be some flexibility here, but there are typical inverter sizes that will limit the choices. You can undersize a system relative to an inverter, but it will cost slightly more per watt this way (I did this because of total budget, but will add a few PV modules later on). The main issue here is how much cash out-of-pocket you can afford, before the rebates (discussed below, these take time to realize).
Using the PVWatts calculator, which is based on real historical data, you should be able to predict how much energy per year you will generate with a given system. You will need to make assumptions on electricity prices to figure out the value of that electricity. There are many other solar calculators available on the web. I suggest you try a few to be sure you understand the trade-offs. My advice is to buy the biggest system within your budget, since changes later will be expensive and inconvenient. Also, if you try to expand your system later you may be displeased to find out that your system parts are no longer in stock - PV modules and inverters are improving all the time and having read some of the warranties, I don't think system expansion is that easy.
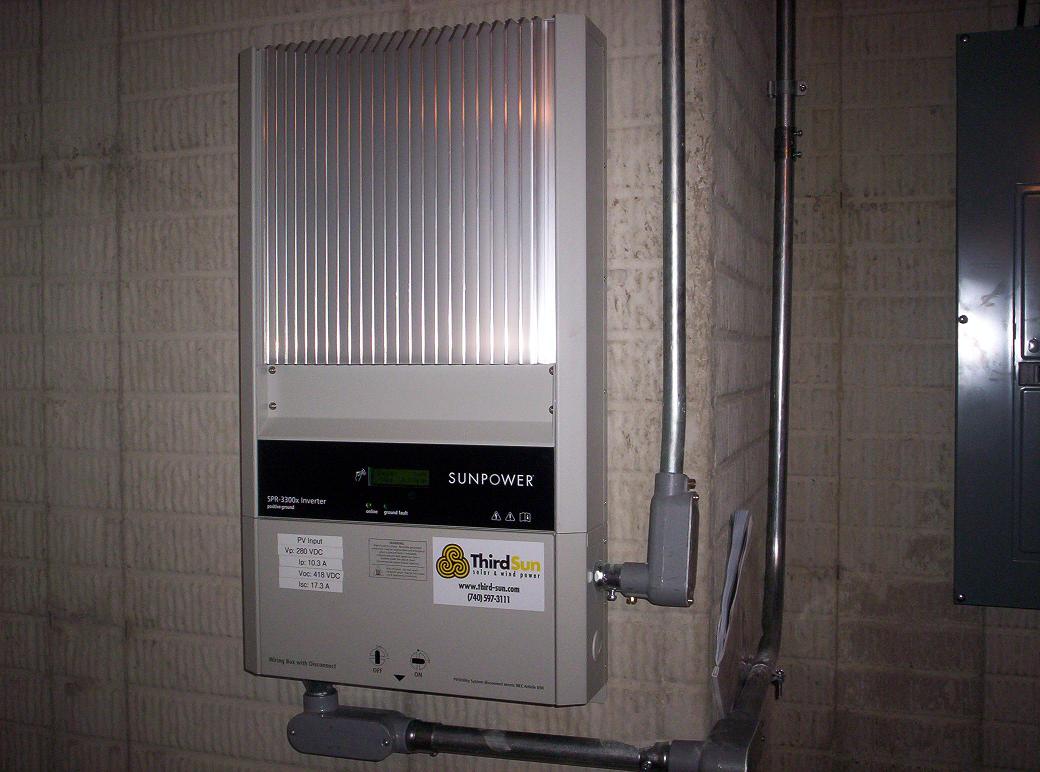
You may also want to buy a remote monitor for your system. It will cost a few hundred dollars, but looks like it ought to cost about $25. However, it will let you view your inverter performance at a more convenient location. I placed my in the garage entrance, so that I can check it whenever I come or go. The inverter will have its own monitor, but, as in my case, may be located out of sight (like a corner of the basement).

Working with the Utility
You will probably need to work with your utility to make the most of your system. In my case, this is AmerenIP. Consider the massive size of their system, your small system is insignificant to them. However, I found AmerenIP to be cooperative and eager to help. The only problem was the complexity and work involved in getting set up. My understanding is that with the net metering legislation, things have changed. Here was my experience:
I contacted them through their website (under renewables). I was assigned a contact in the Decatur office. Here were the main steps:
1) Apply to FERC (Federal Energy Regulatory Commission) as a qualifying facility (QF). This took a few hours of my time to figure out. FERC is not really handy for tiny power generators like rooftop PV. To become a QF, though, isn't really that hard. I simply filed a self-certification form through their website... that's it! You never get a communication from FERC approving or denying it. I found links to the actual law on their website, and if I understand, the if the self-certification stands for 90 days then it is considered accepted. Ameren accepted an e-mail copy of my self-certification. I attach it here for reference. Their website is buggy and their tech support is hit and miss. Good luck.
2) Send the utility your plans. This step requires details about your system and engineering drawings. Ameren charged me a $100 application fee before reviewing the plans. Their engineer will approve your system, which will allow you to attach the plans as an appendix to the connection agreement. From the utility point of view, your "generator" is an inverter; the fact it is supplied by PV doesn't affect them. If your inverter meets UL1741 standards, it should be OK with them.
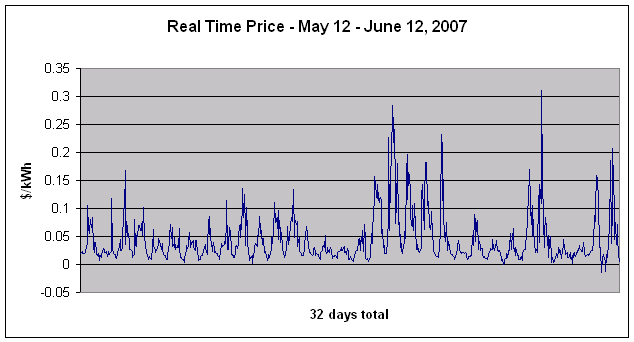
3) Execute a connection agreement (with QF rider). This agreement permits you to backfeed into their grid. Some of the language was for commercial, not residential, providers. I asked them to waive the requirement for insurance, and they agreed on the basis of me being a residential customer. This agreement is really applicable to large generators. For small PV systems, it is a bit thorny so I was relieved they were flexible. The QF rider contained information on rates. You can choose flat fees or real-time pricing (RTP). I understand the rates and laws are changing a lot this year. In Europe there is a nice feed-in tariff for residents, but here the utility actually pays you less than they charge for the electricity they generate. They provide the network, which is obviously worth something. I chose RTP since solar power naturally peaks with the daily price, meaning I will get the highest rate possible for the electricity I feed back in. On some days, at peak load the price you get may be $0.25 to $0.30 per kilowatt-hour. This is about 3-4 times as high as the flat rate. The example below is from the Midwest Independent System Operator.
4) Get a meter. To feed into the grid, and be paid for it, you have to have a bidirectional meter. If you are electing RTP (real-time pricing) rates, you also need a meter that can track when the power is used. Ameren charged me $333.00 for this meter. Ameren is involved with the Power Smart Pricing program as well. This program allows you to use RTP on the power you buy, as well as sell. It also requires a time-of-use meter. My understanding is the bidirectional meter you buy can also be used for Power Smart Pricing. I also am told that the program charges $5.00/month for the meter and $2.25/month for participation. If you provide your own meter, they waive the $5.00/month. I plan to participate shortly, and will update this site with my experience. I will soon be adding a web page describing experiences with RTP (which have generally been positive).
5) Schedule the commissioning. This just involves letting the utility know that you are turning the system on. Eventually, someone from the utility will come out for a brief inspection verifying the type of inverter and location of the disconnect.
With the new legislation, I think the meter is provided for free (meaning I wasted $300 on a meter) and I think some of the paperwork is more straightforward. Let me know if you have any new experiences.
Permits and Inspection
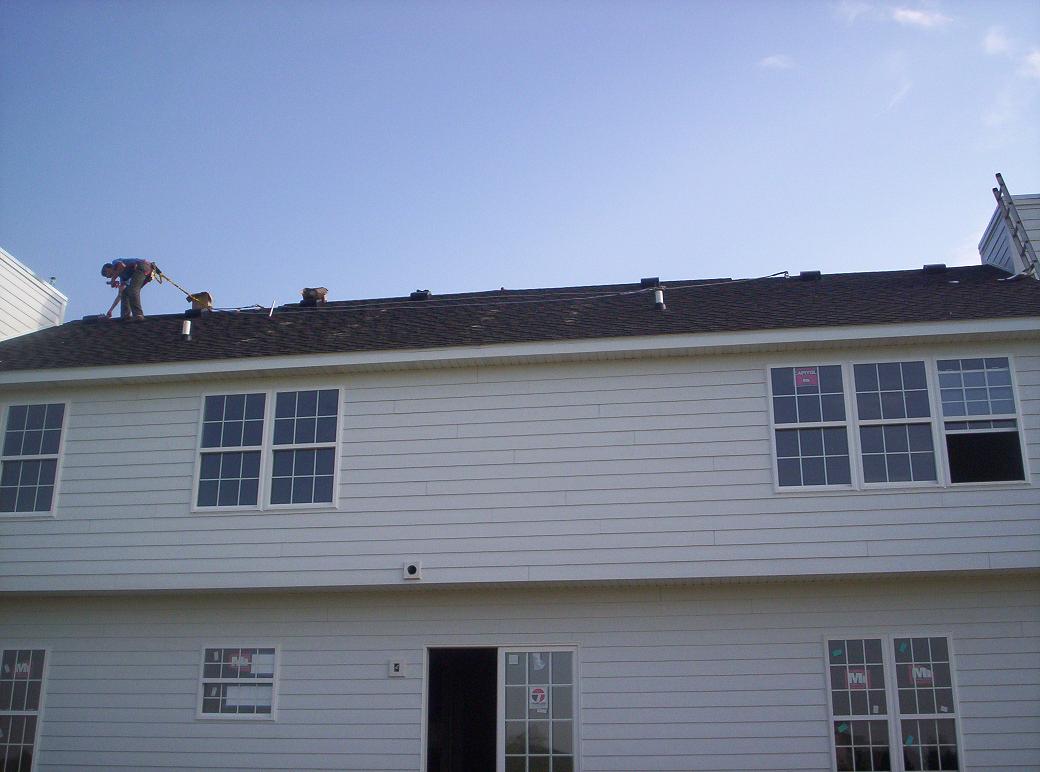
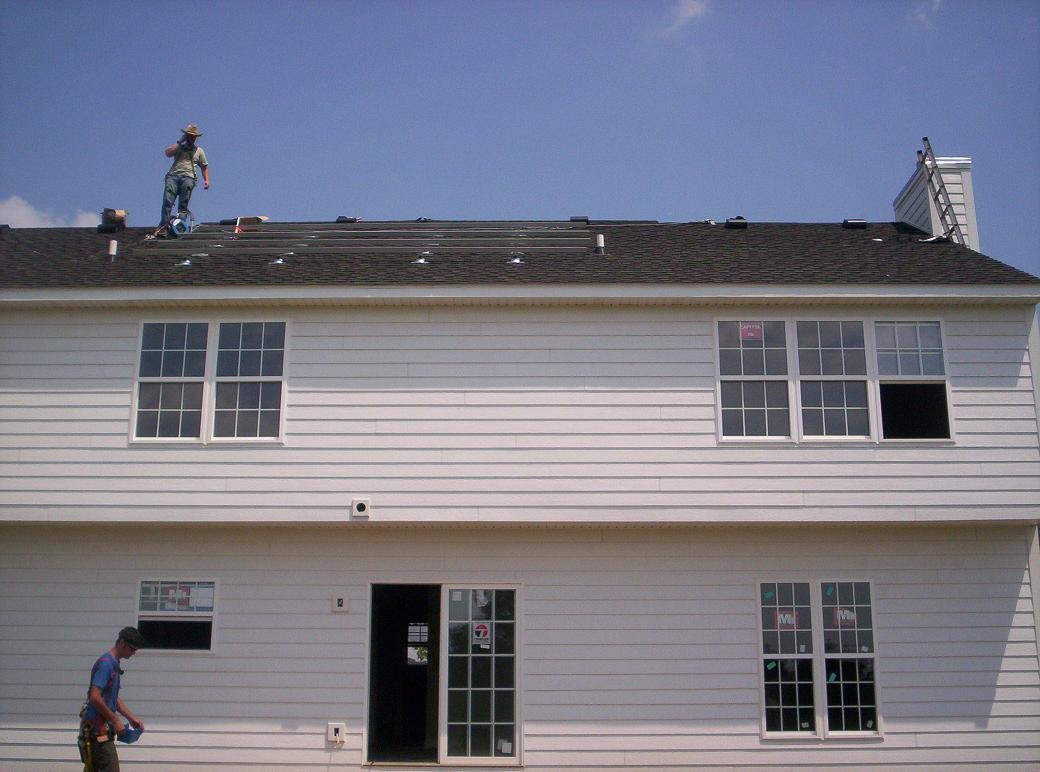
Generally speaking, if someone is pulling wire on your property, they will need a permit and inspection. A PV system will probably classify as "other electrical equipment" and must comply to NEC 2005, or whatever code has been adopted locally. These systems involved both DC and AC wiring, as well as special wire, grounding, and clearance precautions. Many inspectors have not seen PV installations before, and therefore it makes sense to call your local building inspector before starting a project. Make sure you know what will be expected and don't assume anything. This could head-off complications down the line with special local ordnances or other legal matters. In my case, the system was inspected and approved without any changes, but only after a fair amount of five-way discussion between myself, the installer, the electrician, the builder, and the inspector.
Paying for the System
There are many arrangements possible. Aside from cash, some providers will give you financing, but I doubt it is a great rate and term. In my case, I rolled it into my mortgage with the new construction. A refinance or home equity loan could be an equivalent way to do this. Since the system only pays back over the course of decades, it makes sense to finance it over decades. With the home loan you get insurance and tax deductible interest.
In Illinois, there are really two incentives that are feasible for residents. The first is the federal tax credit, which amounts to 30% of the system cost, but is capped at $2,000. The second is the Illinois Solar Energy Rebate Program. This offers 30% off the system cost, up to a $10,000 rebate. Therefore, the rebates max out at a system cost of $33,333, or about a 3.7 kW system at an assumed $9/watt.
The federal credit is relatively easy to get. The state rebate is a little harder. Once you have an installer lined up, you will need to assemble their quotes and drawings into the rebate package. You will further need proof of insurance and license from the installer. You will need proof that your system connects to a public utility. A bill suffices, unless you don't live at the location, in which case you need to get the utility to write a letter stating that you're their customer at the PV system location. Your installer can double check your form, but if the installer is not from Illinois, I would not expect as much help.
Once you have the rebate form and documentation ready, you should submit it before you spend any money. The state will take at least a few weeks to approve it (they have a limit of 90 days). The state will follow-up with the installer to be sure they have serial numbers and other details in line. After that, you can go forward with the installation with more confidence that you will actually receive the rebate. Once finished with installation, you must resubmit the application with proof of installation and working operation (such as a letter from the installer). After that, you should eventually receive a check.
In my case, my check was delayed substantially. First, the state ran out of money for the program for the 06-07 budget cycle. Then, the 07-08 budget hiatus caused by a standoff between the Governor and the Illinois House and Senate caused another few months of delay. I applied for the rebate in late April and received a right around the new year. There were also some delays in Springfield due to confusion on my mailing address. Despite the delays, the contact at the state was cooperative and responsive and helped me work the rebate through the bureaucracy.
As a surprise I got a 1099-G from the state for my rebate. Therefore, I ended up paying federal and state tax on the $8000 check, which pretty much offset the $2000 tax credit. Later, I found out other people had also received a 1099-G. However, one woman I met was successful at filing an amended return stating the rebate was not income (just a rebate, funded by utilities) and received a tax refund. I filed an amended return and have been waiting three months to hear back.
From this, you can see why a do-it-yourself installation could be problematic for the rebate. It appears to be allowed, but the state reserves the right to inspect your system. It took a team of three men 8-10 full hours to install my system, and they had all the right equipment and experience. For these reasons, I advocate letting the professionals do the work so you are better assured of a working system and a rebate. I would advocate a self-installation only if you really have a lot of time and like working on a hot rooftop.
Assessing the Performance: My Case Study
I decided to buy a SunPower system with 14 modules (rated 205 W each, for a total 2870 W) with a 3300 W inverter. I plan to add a few more modules in near future, to capture the full capability of the inverter. In fact, since modules seldom if ever perform at their rating, it is reasonable to put in more PV capacity (like 18 modules, or 3690 W) than the inverter output is rated for. This won't damage the inverter, as it will just shed the extra power on those very rare cases.
From PVWatts (version 1), I selected the Springfield location as being the
closest in latitude to Urbana. The DC
rating of the system is 2.87 kW. I used the standard 0.77 as the derating
factor (this accounts for the losses due to wires, the inverter, dirt, etc.).
I selected a fixed-tilt system (not using a sun tracker). I set the array
tilt at 30 degrees. My roof is pitched 7 ft by 12 ft, meaning the angle is
30 degrees (the arctangent of 7/12). My house is rotated slightly toward
the southwest, about 15 degrees, so the azimuth angle is 180 - 15 = 165 degrees
(or 180 + 15 = 195 degrees, depending on the direction of rotation, it will
yield the same answer). I put in $0.10/kWh for the price of electricity.
In reality, this price will vary for me, so the savings are highly approximate.
The results are summarized below:
|
|
|||||||||||||||||||||||||||||||||||||||||||||||||||||||||||||||||||||||||||||||||||||||||||
Given that this costs about $9/Watt, the total system upfront cost is around $27,000. Subtracting rebates (30% + $2,000), the net out of pocket cost is $16,900. If it produces $366.90 of electricity per year, then the simple payback is mere 46 years! The goal would be to pay back in less than 20 years, which is roughly the lifetime expected of solar power systems.
However, it is likely rates will increase a lot in just ten years. For example, if increasing just 4% per year for ten years yield a rate 50% higher.
Another way to look it at is through equity. As part of your house, and an energy saving feature, the value of the system should hold in resale. According to one study, for every $1,000 of annual energy savings, the solar power system will had $20,000 to the home's value. In the case above, suppose the savings are really $366.90, then the value of the home has increased by $7,338. This will go up as the savings go up with future rates. Furthermore, a pre-existing home with solar is beneficial for the buyer since he/she will not have to go through the system specification/installation/qualification/rebate headache.
Taking this into account, the system only costs on net about $9,562. A key point is that this varies widely with the quality of installation. The SunPower modules I have look very nice, and blend in well with the black roof. Other installations may not fair so well.
Yet another way to look at is through financing and incremental costs. For example, a fixed-rate, 30-year mortgage with a rate of 6.75% would have payments of $109.61. In the first year, the monthly interest would be about $95. Since this is tax deductible, the interest expense is really about $66.50 (assuming 30% marginal rate). The monthly energy savings would be about $30.58. The system is therefore costing about $36/month in the first year, which isn't too bad in comparison to other things we spend money on.
As the years pass, the cost of electricity (and therefore savings) go up, and the interest expense goes down. For example, in year fifteen, supposing 4% increase in rates, the monthly savings would be $55. The monthly interest would be about $70 before tax deductions and about $49 after, for a net gain of $6/month. At this point, the yearly savings would be $660. Using the home valuation example above, the system would have increased the value of your home by $13,200, which is nearly the upfront cost of the system (though the $13,200 is further less valuable due to inflation).
Many more examples are possible, but a couple things are clear:
1) It will take a while to pay back whether we are talking simple payback or through total equity.
2) Assumptions on electricity rates play heavily here. Rates have been capped for a long time in Illinois, and just now we are seeing the effects of true market forces on these rates. With population growth and scarcity of energy resources, I would expect further increases.
3) If you have $16,900 burning a hole in your pocket, then there are other "investments" that will do more for you in 15 years. A 4% APY CD would generate $13,536 in income (less than $10,000 after taxes). However, you would still be paying money every month to the utility to generate power with whatever fuel it chooses. It doesn't really make sense to think of this as an "investment" on par with your normal financial activities - you need electricity, it is now your choice how to buy it! Compare this to buying a more luxurious car or adding a bedroom that is not really needed.
4) A genuine economic analysis is complicated. Many things can change and quantitative assessments of the value of money, electricity (particularly in time-of-use scenarios), and home equity are difficult to make with accuracy. If saving money is the only priority, this is not the simplest option!
5) At this time PV systems are unique (especially in the Midwest) and fun to show off. They are interesting to talk about and do good for the environment. These qualities are also of value.
Performance to Date
As of this update, my system has produced more energy than I originally expected. I expect it to degrade slightly over the years due to soiling and natural degradation. One of my PV modules appears to have been cracked, probably by an errant golf ball.
I also wanted to comment on the Power Smart Pricing program. So far, I have been happy with this program. I was one of the first people to sign up and try to use it. I have my thermostat programmed to set back during the usual high-price times of day (recall I have a geothermal system, which is electrically powered). The latest report I got from Ameren showed I had saved about 10% on my bill over 18 months. I saved over 40% in some months, and I think I need to fine tune my thermostat settings a bit, particularly in winter months, to save more.
If you found this information helpful, please let me know: e-mail. Please link this site into yours! Also, if you have a site, I will gladly add it to this page.
Return to PatrickChapman.com.